Tuesday, December 27, 2011

Liferay Portlet Backend: Service Builder Discussion

Is service builder good enough? Are Spring and Hibernate the best option?

When I first started Liferay Portlet development, the first thing I came across with was "Service Builder", my first thought was "this is awful", with the following reasons:

  • It didn't allow me to do TDD but to directly write business code and then generate the interface out of it.
  • It generates a lot of classes, and I'm only allowed to modify a few (just one I think).
  • The resulting code throws a lot of exceptions (the same as the Liferay API) and I'm really not into throwing lots of exceptions.
But as every first step I was able to look at the configuration files it generates and then learn how I could create my own Spring framework context using the same data source as liferay and having a great coding experience with Hibernate and Spring.

Everything seemed fine until I realized that it wasn't the best option, three reasons I can think of right now are:
  • No support for global transactions, this means the transaction my code manages is different than the transaction of the Liferay API calls so no global rollback for me.
  • No support for database sharding, well not precisely but If I wanted it to work transparently, I would have to make my own way through it.
  • No direct relationships of my data model with the Liferay entities, this means no automatic foreign keys for example.
So then I realized that I was trying to kill a fly with a nuclear bomb, this is the fact: You COULD create huge applications with portlets in Liferay but portlets (as any other liferay plugin) are for customizing the web portal and not to build huge applications. 

If we lower down the scale and say a portlet is just a customization:
  • It's so simple we don't need to write many test classes.
  • We may care of having it done quickly and don't care so much if it's THAT pretty.
  • We may want to make things consistent with the existing API.
  • We don't want to miss Liferay features.
Service Builder is great at this, it generates code following many conventions, it generates javadoc and it basically does all the boilerplate for you so you only need to write 10 to 20 lines of business code and that's it.

So as a conclusion I would say that Service Builder is the best option if you're planning to use liferay as a web portal and not as an app container. If you're using it as an app container (which I really don't recommend) and you don't care that much of loosing a couple of liferay features, then you should definitely go with Spring and Hibernate since your life will be a LOT easier and you'll be able to write unit tests and those kinds of thins. 

Sunday, December 11, 2011

jDTO Binder - Immutable DTOs

jDTO Binder 0.6 is out and with one new great feature. A really good practice in java is to minimize mutability of objects and with this you gain thread safety and also you can optimize memory by creating an instance pool; jDTO Binder can now instantiate objects by using a constructor other than the default and therefore making possible immutable DTO's

In order to take advantage of this feature, your DTO class should have one or more constructors with arguments and none default constructor. Also since some limitations of the Java Reflection API you need to configure each constructor argument to specify which will be the source value.

The following is an example of an immutable DTO:
public final class SimpleImmutableDTO {
    private final String firstString;
    private final String secondString;
    
    //make this the DTO constructor.
    @DTOConstructor
    public SimpleImmutableDTO(@Source("myString") String firstString, @Source("related.aString") String secondString) {
        this.firstString = firstString;
        this.secondString = secondString;
    }
    
    public SimpleImmutableDTO(String firstString, String secondString, String thirdString) {
        this.firstString = firstString;
        this.secondString = secondString;
    }
    
    public String getFirstString() {
        return firstString;
    }

    public String getSecondString() {
        return secondString;
    }
    
}

Immutable DTOs can take advantage of all of the features regular DTOs can except for "transient" constructor arguments which at the time doesn't make sense to me.

Also this feature is enabled for XML configuration:
<dto type="com.juancavallotti.jdto.dtos.SimpleImmutableDTO">
    <immutableConstructor>
        <arg type="java.lang.String">
            <source name="myString" />
        </arg>
        <arg type="java.lang.String">
            <source name="related.aString" />
        </arg>
    </immutableConstructor>
</dto>

Thursday, December 8, 2011

Best Web Framework for Liferay Portlet Development

Over the past months I've tried several web frameworks for portlet development on the liferay community portal.

The options I've tried are:


  • The framework liferay provides. (MVC Portlet, Alloy UI)
  • Spring Portlet MVC
  • Vaadin
  • Java Server Faces (Portletfaces and Primefaces components)
  • Java Server Faces (Portletfaces and IceFaces components)
  • Apache Wicket.
In my opinion, I would rate these frameworks in the following way:
  1. JSF Primefaces
  2. Spring Portlet MVC
  3. Vaadin
  4. Liferay Framework
  5. JSF IceFaces
  6. Wicket.
This is the discussion of each:

JSF Primefaces

This is the one I found best, easy to configure, most of the components working out of the box, and easy spring integration. The con is, if you're used to JSF 2 and greater you'd find some missing features which are kind of important like view scoped managed beans and you loose the ability to send parameters over EL (this is because of the spring integration). But in general terms this framework fits great for general portlet development.

Spring Portlet MVC

This framework really gets along with the portal and is the ideal thing if you like to code tons of javascript and have fine grained control over everything. The con is the increased development time and if you have a project with lots of portlets then you'll have a lot of xml files.

Vaadin

Vaadin does a great job also for portlet development most of the components work out of the box, but it has some annoyances: 
  • Every time you change something you need to re deploy your portlet.
  • You need to have the same vaadin library you're developing deployed on your portal which may cause problems with older vaadin portlets.
  • Compile-time weaving for spring integration.
  • Some features mising.
Liferay Framework

This framework works really well on liferay, but is really a developer nightmare, not well documented, lots of javascript and java code, difficult to integrate with your own spring context. In general terms, this is only well-suited for really simple portlets with no ajax support.

JSF IceFaces

This is supposed to be the best option for liferay JSF portlet development, or at least that's what the creators say, nevertheless I couldn't really make it work after several hours of configuration and web browsing, but as it is a JSF framework, the basic jsf features work well, and I think with the proper documentation this could get really good.

Wicket
Even though I love wicket and was the first option I tried, I was disappointed that it barely worked. No wicket magic for ajax support and also wicket dropped support for portlets on 1.5 so really, is not a good option for liferay.

Well, that's it with the frameworks, I hope this short review can help you to find the best framework for developing liferay portlets.

Monday, November 7, 2011

jDTO Binder - New Logo and new Value Mergers.

As I'm currently with no computer at all, I could make just little progress on jDTO, but today I'm proud to announce that I have created for it the logo, the same is also open source svg:

If it should have a meaning, then the arrows could mean the data transportation and the letters are self-explained.

Another new feature that will be seen on release 0.5 is a new "age" value merger, if a source field is a Date or Calendar instance, then it will calculate the time between now and the given date in different time units: Years, weeks, days and any user-defined number that represents an interval of milliseconds.

I want to thank my friend Gustavo Genovese for reviewing my code and helping me with a nice solution for compensating leap years with a fixed interval.

Please any suggestions with the logo or any contribution of any kind will be greatfully received.

You can find an updated version of the jDTO book here. (It will be always updated since it points to my master branch).

Sunday, October 30, 2011

jDTO Binder - Java DTO Framework

DTO design pattern is mainly used to make a clean separation between layers. The DTO objects are meant to be part of the API of each application layer. Even though they're quite good on separation, they do have some costs associated: If not well managed, you'd probably end up by having lots of them, sometimes with mostly the same attributes between one another; on the other hand you might mitigate this by making a huge DTO with lots of information but ending up with the loss of lazy loading from the persistence layer. The previous costs must be managed by the developer and there's not much a framework can do besides generating the DTO classes, which have it's own disadvantages.

One really painful thing about using the DTO pattern is that the developer must take care of copying the data from one side to another and that's where jDTO Binder framework comes in handy. This framework is also an implementation of a bigger concept which I like to call "Object to Object Mapping" or simply OOM, and this concept is vey similar to another related and existing concepts like Object Relational Mapping (ORM) and Object XML Mapping (OXM).

This framework is still under development, but is quite stable to be used in production environments, in fact it is being used successfully on production environments.

The url for the full documentation can be found here:
https://github.com/juancavallotti/jDTO-Binder/wiki/jDTO-Binder---Java-DTO-framework.

And here's how to get started:

An example project can be found for download here.

First of all, we need to add the dependencies to our pom.xml file:

<dependency>
    <groupId>com.juancavallotti</groupId>
    <artifactId>jdto</artifactId>
    <version>0.4</version>
</dependency>
<dependency>
    <groupId>commons-lang</groupId>
    <artifactId>commons-lang</artifactId>
    <version>2.6</version>
</dependency>
<dependency>
    <groupId>org.slf4j</groupId>
    <artifactId>slf4j-log4j12</artifactId>
    <version>1.6.2</version>
</dependency>

I've decided the framework shouldn't have too many dependencies, so I've picked up those which must be (IMHO) in every serious java project:

  • SLF4J - So you can log the output with your favorite logger.
  • Commons Lang - This library is really useful, so if you're not using it, you should!

And also the repository to get jDTO:

    <repositories>
        <repository>
            <id>com. juancavallotti</id> 
            <name>jdto</name> 
            <url>http://juancavallotti.com/maven2</url> 
            <layout>default</layout>
        </repository>    
    </repositories>

Next we need to create some classes to act as source business objects, note that jDTO uses the property accessor methods (AKA getters and setters) to read property values from source beans, you should consider this and you can take advantage of this fact because you can read information without necessarily accessing a field.

A typical person class:

public class Person  implements Serializable {
    private long id;
    private String firstName;
    private String lastName;
    private Date birthDay;
    //GETTERS AND SETTERS
}

And a bill class with it's items:

public class Bill {
    private String clientName;
    private Date billExpiration;
    private List<BillItem> items;
    //GETTERS AND SETTERS
}

public class BillItem {
    private String itemName;
    private double price;
    private int amount;
    private double taxPercentage;
    //GETTERS AND SETTERS
}

These classes are used to show some of the features of the framework.

So we're now ready to start filling out some DTO's.

First we'll take a look a the PersonDTO, this one is rather simple, but it shows some of the key features of jDTO framework, binding by convention (default behavior), formatting fields and composing one field out of multiple fields:

public class PersonDTO implements Serializable {
    
    //bound by convention
    private long id;
    
    @Source(value="birthDay", merger=DateFormatMerger.class, 
            mergerParam="dd/MM/yyyy")
    private String birthday;
    
    @Sources(value={@Source("firstName"), @Source("lastName")}, 
            merger=StringFormatMerger.class, mergerParam="%s %s")
    private String fullName;
    //GETTERS AND SETTERS
}

And finally, we use the framework to bind the data:

DTOBinder binder = DTOBinderFactory.getBinder();

//bind a person to a person DTO
Person person = SampleData.samplePerson();
PersonDTO dto = binder.bindFromBusinessObject(PersonDTO.class, person);

It's really recommended you keep the DTOBinder instance as a singleton, so for that matter, the framework already provides you this facility, you  only need to call DTOBinderFactory.getBinder() and it's all done for you.

Next, we may want to build a DTO out of a bill but this time we just want the customer name and the amount of money the bill is worth, so here is how the DTO looks like:
public class BillDTO {
    
    //bound by convention
    private String clientName;
        
    @Source(value="items", merger=SumExpressionMerger.class, 
            mergerParam="(price * amount) * (1 + taxPercentage*0.01)")
    private double billTotalPrice;
    //GETTERS AND SETTERS
}

The final application code looks like:

public static void main(String[] args) {
        
    //get an instance of a singleton binder
    DTOBinder binder = DTOBinderFactory.getBinder();
    
    //bind a person to a person DTO
    Person person = SampleData.samplePerson();
    PersonDTO dto = binder.bindFromBusinessObject(PersonDTO.class, person);
    
    System.out.println(dto);
        
    
    Bill bill = SampleData.sampleBill();
    BillDTO billdto = binder.bindFromBusinessObject(BillDTO.class, bill);
    
    System.out.println(billdto);
}

And the output is:
PersonDTO{id=1, birthday=30/10/1982, fullName=Michael Princeton}
BillDTO{clientName=I'm a Client, billTotalPrice=22.0}

This is all for this small tutorial, please feel free to submit bug reports or feature requests on the issue tracker of the github project.

Sunday, July 31, 2011

JSon and XML Views on Spring Web MVC

These past weeks I started a research on how was the best way to develop portlets for the liferay content manager, while on that research I came across the Spring Web MVC framework from which I've heard so many good things but until then never developed anything with it.

Even though developing portlets was somehow fun, I learned now why that framework is so loved also for regular web developers. And finally I'm loving it too :)

On this post I'll show you how to render with little efforts views on XML and JSon that are suitable for ajax development. I won't go through the boilerplate configuration for maven dependencies and the basic Spring Web MVC dispatcher portlet, spring context, etc. What I will show is how to configure and inject views suitable for transparently render xml and JSon out of JAX-B annotated Pojos.

If you want to see the whole example project, download it here. It requires Tomcat 7 or another Java EE 6 web container.

Library Requirements:

For the following practice I'll take advantage of the following libraries:

  • The High Performance Jackson JSON processor.
  • Spring OXM Integration (for xml rendering).
If you want to look at the configuration, I've uploaded the sample project to my file application so you cant download it.

Let's get Started.

First of all, We'll take a look at the POJOs we'll be converting to XML and JSon:

 @XmlRootElement  
public class ActionStatus implements Serializable {
private static final long serialVersionUID = 1L;

private boolean success;
private String message;

public ActionStatus() {
}

public ActionStatus(boolean success, String message) {
this.success = success;
this.message = message;
}
... //getters & setters
}

This one is generic and it helps us to provide feedback to the user.

 @XmlRootElement  
public class Contact implements Serializable {
private static final long serialVersionUID = 1L;


private String name;
private String email;
private String phone;

public Contact() {
}

public Contact(String name, String email, String phone) {
this.name = name;
this.email = email;
this.phone = phone;
}
... //getters & setters
}

This one represents a contact which we could push or pull to/from the database.

Please notice that I've only added the @XmlRootElement annotation at class level. This annotation is a JAX-B annotation (you can see a better explanation from this pervious post) and it will help us to convert to both XML and JSon format. (The same way JAX-RS works).

Now we need to configure the views on our applicationContext.xml file (or on the dispatcher servlet xml file if you wish).

XML: MarshallingView

In this case we'll define the view as a bean, this view takes a Marshaller implementation as the constructor argument:

   <!-- the json view -->  
<bean id="jaxbAnnotationBinder" class="org.codehaus.jackson.xc.JaxbAnnotationIntrospector" />
<bean id="jsonObjectMapper" class="org.codehaus.jackson.map.ObjectMapper" />
<bean id="jsonview" class="org.springframework.web.servlet.view.json.MappingJacksonJsonView"
p:objectMapper="#{jsonObjectMapper.setAnnotationIntrospector(jaxbAnnotationBinder)}" />

If we want to improve the implementation we can scan the beans from the classpath using the annotation (I'll let it as an exercise).

JSon: MappingJacksonJsonView

In this case we'll define some beans to bootstrap Jackson:
  • A JAX-B annotation introspector: this will use the JAX-B annotations to obtain metadata from the POJO.
  • An ObjectMapper implementation: this will use the given introspector to map our fields to JSON.
Finally, we can define the MappingJacksonJsonView bean as follows. I use a little SpEL to perform the magic trick.

   <!-- the json view -->  
<bean id="jaxbAnnotationBinder" class="org.codehaus.jackson.xc.JaxbAnnotationIntrospector" />
<bean id="jsonObjectMapper" class="org.codehaus.jackson.map.ObjectMapper" />
<bean id="jsonview" class="org.springframework.web.servlet.view.json.MappingJacksonJsonView"
p:objectMapper="#{jsonObjectMapper.setAnnotationIntrospector(jaxbAnnotationBinder)}" />

Finally, we can inject the view we wish to use on our controller as follows:

 @Controller  
public class IndexController {

@Autowired
@Qualifier("jsonview")
private View jsonView;

@Autowired
@Qualifier("xmlview")
private View xmlView;

@RequestMapping({"/", "/index.htm"})
public String homePage() {
return "index";
}

@RequestMapping("/contact/blank/xml")
public ModelAndView createBlankContactXml() {
return new ModelAndView(xmlView, "response", new Contact("blank", "blank@blank", "123456789"));
}

@RequestMapping("/contact/blank/json")
public ModelAndView createBlankContactJson() {
return new ModelAndView(jsonView, "response", new Contact("blank", "blank@blank", "123456789"));
}

@RequestMapping("/contact/save")
public ModelAndView createContact(Contact contact) {
System.out.println(contact.toString());
return new ModelAndView(jsonView, "response", new ActionStatus(true, "Woohooo"));
}

}

Note that we could change the way the POJO is rendered by just changing the string on the @Quailifier annotation. I find this approach very easy and elegant.

Hope you find this useful.

Sunday, July 3, 2011

Getting Started With Apache Maven

A couple of days ago, I spoke on a tech talk of how to get started with apache maven. Some of you may know and use maven and some of you don't.
I've created a presentation explaining some things about maven, specially why to use it and what are the problems it solves, which you can of course download.

Also I've recorded a video on how to get started by creating a project, running it, and exploring how eclipse and netbeans can work with maven projects.


Hope you find it useful.

Sunday, June 26, 2011

Spring AOP Scoped Proxies

In this post I'll be discussing the Spring AOP Scoped Proxies as a way to expand the scope of the beans managed by the spring IoC container. So far we know two types of scopes common to the IoC container: Singleton, just one instance per container, and Prototype, one instance per client (of the bean). The previous two scopes can give us an idea of stateless/stateful beans but in some context there are other contexts that can be useful, for example in a web application we can think on the scope of a request or the scope of a session to make parts of the application that only makes sense on a web context.

It's true that the right thing to do when we're designing our backend is to try and do the whole functionality as independent of the context as possible but sometimes having a bean that depends on the context makes the application logic so simple, elegant and easy to code that we're tempted to make things that way, for example, if we're coding an application logic that depends a lot on the information of the currently logged user it would be really handy to have in our bean something like this:
 @Autowired
private CurrentUser currentUser
And then get the data as we please. But the thing is with the prototype scope or singleton scope it would be very difficult to achieve this, specially when a lot of users ar accessing the app simultaneously. So to this purpose we'll configure the AOP scoped proxies.

First of all, we'll speak about the dependencies we need:
  • Spring AOP, to have the AOP functionality in our application.
  • CGLIB if we're going to have proxies for classes that doesn't implement any interface.
Then, we'll have our standard configuration but apart from that, some special configuration so spring can tell which request matches to which thread and thus access the session and request scopes.

We'll add the following lines in our web.xml file:
   <listener>
<listener-class>org.springframework.web.context.request.RequestContextListener</listener-class>
</listener>
Finally we configure the bean to be session scoped or request scoped:

 @Service
@Scope(value="session",proxyMode= ScopedProxyMode.TARGET_CLASS)
public class CurrentUser implements Serializable {
//session data here
}

If we're configuring our beans in the XML fashion, then we add the tag:
 <bean ... scope="session"> 
<aop:scoped-proxy/>
</bean>
To our bean definition and that's it. Really easy and really clean because our bean logic doesn't get dirty with Servlet spec classes and if we need to switch this logic to be for instance a desktop application, we can always switch the bean to be singleton and take care of it by ourselves.

Monday, June 20, 2011

How to Integrate Spring with GWT Servlet

One thing you may be wondering when you start a new (and maybe your first) GWT project using spring framework on the back-end is how can we autowire the remote service servlets with the Service beans on the backend?

There are many ways to achieve this, but my favorite is very simple and direct, and it may be a great solution if you're looking on how to autowire a servlet too, and is to create a new superclass for all our RemoteServiceServlets, I called that superclass SpringServiceServlet, and it looks like this:
 package com.juancavallotti.server;  

import com.google.gwt.user.server.rpc.RemoteServiceServlet;
import javax.servlet.ServletConfig;
import javax.servlet.ServletException;
import org.springframework.web.context.support.WebApplicationContextUtils;

/**
*
* @author juancavallotti
*/
public class SpringRemoteServiceServlet extends RemoteServiceServlet {
private static final long serialVersionUID = 1L;

@Override
public void init(ServletConfig config) throws ServletException {
super.init(config);
WebApplicationContextUtils
.getRequiredWebApplicationContext(getServletContext())
.getAutowireCapableBeanFactory()
.autowireBean(this);
}

}

So from now on, we just extend this class when writing our services and we get full autowire capabilities.

Hope you find it useful.

Sunday, June 12, 2011

List Edit Form in Wicket 1.5


I had some spare time to have further fun with wicket 1.5 and I came up with this mini-howto to create a multiple-item edit form, this is very simple to do in some frameworks but I think in wicket is easier! So let's get started.

The final result will look like the following image:
It's a simple table that has an add Item button to add an extra row to enter contact information, and the submit button which is supposed to do something interesting with the data.

First of all, here is the HTML file, pretty standard stuff:

 <!DOCTYPE html>  
<html>
<head>
<title></title>
<meta http-equiv="Content-Type" content="text/html; charset=UTF-8">
</head>
<body>
<h1>List Edit Form</h1>
<form wicket:id="multiform">
<table>
<thead>
<tr>
<th>Name</th>
<th>Last</th>
<th>Email</th>
</tr>
</thead>
<tbody>
<tr wicket:id="forms">
<td><input type="text" wicket:id="name" /></td>
<td><input type="text" wicket:id="lastName"/></td>
<td><input type="text" wicket:id="email"/></td>
</tr>
</tbody>
</table>
<button type="submit" wicket:id="addItemButton">Add Item</button>
<button type="submit" wicket:id="doSomethingUseful">Submit</button>
</form>
</body>
</html>

As we can see, we have the form fields on the table, bound with wicket ids, and obviously the row has an id to match a wicket iterator component and of course the form has an id too.

We'll be editing contacts so we create a contact bean to hold the important information for the contacts, here I show only the attributes but imagine that this bean should have getters and setters for the attributes and it's better if you implement equals and hash code.

   
public class Contact implements Serializable {
private static final long serialVersionUID = 1L;
private String name;
private String lastName;
private String email;
....
}

Now let's take a look at the code for the page:

 package com.juancavallotti.wicket15.forms;  

import java.util.ArrayList;
import java.util.List;
import org.apache.wicket.ajax.AjaxRequestTarget;
import org.apache.wicket.ajax.form.AjaxFormSubmitBehavior;
import org.apache.wicket.ajax.markup.html.form.AjaxSubmitLink;
import org.apache.wicket.markup.html.WebPage;
import org.apache.wicket.markup.html.form.Form;
import org.apache.wicket.markup.html.form.SubmitLink;
import org.apache.wicket.markup.html.form.TextField;
import org.apache.wicket.markup.html.list.ListItem;
import org.apache.wicket.markup.html.list.ListView;
import org.apache.wicket.model.PropertyModel;

/**
*
* @author juancavallotti
*/
public class MultiFormPage extends WebPage {

private static final long serialVersionUID = 1L;
private List<Contact> contacts;

public MultiFormPage() {

contacts = new ArrayList<Contact>();
final Form multiform = new Form("multiform");
multiform.setOutputMarkupId(true);

//the list of items
multiform.add(new ListView("forms", new PropertyModel(this, "contacts")) {

private static final long serialVersionUID = 1L;

@Override
protected void populateItem(ListItem item) {

item.add(new TextField("name", new PropertyModel(item.getModelObject(), "name")));

item.add(new TextField("lastName", new PropertyModel(item.getModelObject(), "lastName")));

item.add(new TextField("email", new PropertyModel(item.getModelObject(), "email")));
}
});

//actions for the add item button
multiform.add(new AjaxSubmitLink("addItemButton") {

private static final long serialVersionUID = 1L;

@Override
protected void onSubmit(AjaxRequestTarget target, Form<?> form) {
contacts.add(new Contact());
target.add(multiform);
}

@Override
protected void onError(AjaxRequestTarget target, Form<?> form) {
target.add(multiform);
}
});

//actions for the submit button
multiform.add(new SubmitLink("doSomethingUseful") {

private static final long serialVersionUID = 1L;

@Override
public void onSubmit() {
System.out.println(contacts);
}
});

add(multiform);
}
}


Here we create the form, and add to it a list view, in the list view we populate the item with text fields and a property model that will perform the actual magic when the form is submitted.

Then we add the button to create new items, which is responsible for adding a new contact on the contact list and repainting the whole form on the client.

And finally we add the button to submit the form to hopefully someday do something interesting with the bunch of contacts the users will input.

Reflecting the data changes Immediately

An enhancement for this would be to reflect data changes as soon as the user makes them. This only requires a small code change. We add for each text field an ajax submit behavior for the event "blur" and that's it, the following snippet shows how to do it.

       @Override  
protected void populateItem(ListItem item) {

item.add(new TextField("name", new PropertyModel(item.getModelObject(), "name"))
.add(new BlurSubmitBehavior(multiform)));

item.add(new TextField("lastName", new PropertyModel(item.getModelObject(), "lastName"))
.add(new BlurSubmitBehavior(multiform)));

item.add(new TextField("email", new PropertyModel(item.getModelObject(), "email"))
.add(new BlurSubmitBehavior(multiform)));
}

   class BlurSubmitBehavior extends AjaxFormSubmitBehavior {  
private static final long serialVersionUID = 1L;

public BlurSubmitBehavior(Form form) {
super(form, "onblur");
}

@Override
protected void onSubmit(AjaxRequestTarget target) {
//we do nothing but we could do something interesting
System.out.println(contacts);
}

@Override
protected void onError(AjaxRequestTarget target) {
}
};


That's all for now, hope you find it useful.

Sunday, June 5, 2011

How to integrate Maven, GWT and Netbeans IDE

On the past I've created a web application based on GWT and in Netbeans IDE. I have to say it was a total nightmare! The version of GWT I worked with is 1.7, now things have changed, version 2.x is here for a long time and there are many tools to work with it.

A piece of advice.
For those who want to start a new GWT project, I still encourage them to use Eclipse IDE with the Google Plugin, the sad truth is eclipse is really MUCH better to work with GWT than Netbeans and has many tools such as visual designers and wizards to do things easy and all of that. Nevertheless, if you use maven you can work with both IDE's and take the best from both worlds!

Let's get started.
First of all you will want to have some help with code editing, refactoring, creating new files out of a template and so on, to do this you want to install the GWT4NB plugin, this plugin can be easily installed on the Netbeans plugin manager or downloaded from the Netbeans page.

This plugins enables the IDE with very helpful stuff, it also works fairly well with maven and ant projects. To use ant you should download the GWT SDK and instruct the plugin on where to find it.
Maven Dependencies
Now we want to have the actual GWT libraries to start coding our application, so we need to include two important dependencies:
  • gwt-user: With this dependency we have the core GWT API, we may choose the version we like but the important thing is the scope of this library, we will add this library as provided because we'll only use it when compiling gwt code to javascript, if we don't set this dependency to provided, it will end up on the final WAR making it heavier.
  • gwt-servlet: We need this to process RPC requests and it isn't really used on development so we'll set the scope for this dependency to runtime.
     <dependency>
<groupId>com.google.gwt</groupId>
<artifactId>gwt-servlet</artifactId>
<version>${gwt.version}</version>
<scope>runtime</scope>
</dependency>
<dependency>
<groupId>com.google.gwt</groupId>
<artifactId>gwt-user</artifactId>
<version>${gwt.version}</version>
<scope>provided</scope>
</dependency>
Now that we have the GWT dependencies and we have no more problems to compile our JAVA code, we need a way to compile the client code into Javascript. Also we need a way to start GWT development mode to be able to test our code, to do this we'll use the Maven GWT plugin.

We can hook (or not) the Maven GWT plugin into our lifecycle, but the very annoying thing of working with GWT on Netbeans (at least for previous releases) is the fact that you end up compiling the GWT client side as many times as you compile the application, and believe me you don't want to waste two extra minutes of your life for each build, so I removed the build hook.
You can fire at will the gwt client side code compilation using the goal gwt:compile of the maven GWT plugin.
       <plugin>
<groupId>org.codehaus.mojo</groupId>
<artifactId>gwt-maven-plugin</artifactId>
<version>2.2.0</version>
<executions>
<execution>
<goals>
<!-- remove this to not compile gwt client every time -->
<goal>compile</goal>
<goal>test</goal>
</goals>
</execution>
</executions>
<configuration>
<hostedWebapp>${project.build.directory}/${project.build.finalName}</hostedWebapp>
</configuration>
</plugin>
Running and Debugging in Development Mode
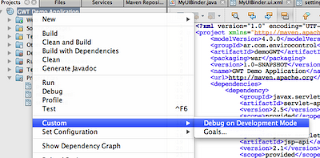
Something brilliant about development mode is the possibility to change code and see the changes as soon as you reload the browser, so we obviously want the ability to do that. The maven GWT plugin provides us with two goals to start the development mode: gwt:run and gwt:debug.

If we choose to use the gwt:debug goal, then the plugin tells us the parameters to attach out JPDA debugger to the hosted mode, and then set breakpoints at will.

Pitfalls and Gotchas
There are some pitfalls and gotchas when working with GWT. The most important one is: If you plan to use a J2EE full profile container (and with it use EJBs and persistence), my advice is: Do not use GWT, or use it in a way you lookup EJBs using JNDI. This is because GWT development mode deploys the application on a Jetty server who knows nothing about EJBs and such. A better solution would be to use the spring framework, not only because it's better but the spring framework doesn't have any problem on running on jetty.

That's all for now, hope you find it helpful.

Thursday, June 2, 2011

How to know the Seniority level of a Developer?

One tough thing to do when looking to hire an employee is to tell with some level of certainty to which of these three famous groups of seniority belongs, I'm talking of course of the "Junior" "Semi Senior" and "Senior" groups.

Many people take in account the years of experience, some others combine this with some questions of framework-related knowledge, problem solving capability and others ask very specific questions about weird constructions on the language that probably are never used even in huge applications.

Truth is no one knows for sure what makes a developer member of one of the seniority groups. I've had the chance to interview many people on my career and also have been interviewed several times so I'll try to explain in the following lines my take of what is the evolution for developers.

The four Stages
When somebody start with the ways of development it goes through four stages but it doesn't depend on the time (only) to go through them or the experience in a single project or technology but the will of the person to IMPROVE. I put the word in capitals because this is the key on the whole process, you can have like 10 years or more in one technology, language, platform, tool, etc, but if you don't have the will to improve, you'll still be considered a Junior. Obviously over time that person will gain some knowledge so time does matter and it matters a lot! But let's start with the stages.

The programming stage: in this stage this guy realizes that he understands the programming language and has the ability to print messages on the screen at will!! :O it also notices that he can make sense of a graphic UI design tool and write code behind some buttons or read textfields. This guy maybe want's to start earning some money with his apps and with luck he does. People who are on this stage are AMATEURS, they aren't really acknowledged as professionals but they make their way and build some apps.

The designing stage: if this amateur guy want's to improve it will soon learn that he's writing a lot of duplicated code, he feels that he's writing always the same thing to achieve similar behaviors so he begins developing interest for design patterns and pre-built things to ease things a bit. Also at this point he has some knowledge of what's going on, he is going beyond recipes, he is starting on the professional side. People on this stage can be considered JUNIORS, they have some foundation knowledge use a lot of pre-built things, and love recipes. These guys now can achieve things, in fact they can achieve many things and they really do! but there's still a long way of maturity and improvement left.

The deciding stage: After doing a lot of applications as junior using pre-defined recipes and tricks, these developers are starting to be very productive with the development tools, have some deeper understanding of how frameworks work and also now it's easy to learn how new frameworks work, so they become SEMI-SENIOR they now can tell why they're doing what they're doing. They now care about the performance of the application, they know most of the good practices of the programming language and can solve some complex programming problems.

The quality stage: One of the most hard things to do is to tell between a semi-senior developer and a senior one, but think about evolution! These semi-senior developers want to improve and they now can work very comfortable in small and big projects but they realize that the code doesn't go away as soon as they deliver. They start thinking on how the code they're writing right now will look on the future. They think about quality! they want to make things readable, they want to be able to re factor without breaking things they can foresee problems and solve them before they happen so all of these makes them to produce really good code easy to read, complex application logic that your grandma can understand! These guys are SENIOR, and they start delivering code with increasingly high quality well designed, well documented, effective, etc.

This is my take on seniority after several hours of thinking, my aim is to share and discuss what seniority means in development, feel free to post comments on the subject.

Sunday, May 29, 2011

Playing with Wicket 1.5

This weekend I played with the new wicket 1.5 and saw some improvements that I'd like to share. These improvements are about page mounting and page parameter translation, it turns out that we don't choose anymore how parameters will be passed to the page when we mount the page but just simply mount the page and then you can read parameters in a new way.

Mounting a Page.
To mount a page we just need to (as always) call the mount method on our application class, but we can note that the wicket folks have removed (not even deprecated) the mount methods that take IRequestTargetUrlCodingStrategy as a parameter and instead created a simple mountPage method.

Here is an example of how pages will be mounted from now on:
   @Override  
protected void init() {
super.init();
mountPage("/home", HomePage.class);
}

Reading the Parameters.
Some of you may ask, if the URL coding strategies have been removed, now how can we read the page parameters?
The answer is simple! From the PageParameters object we get on the page constructor, this class has been rebuilt and moved into another package and no longer extends ValueMap, this change is HUGE and it will impact lots of my code for sure, but anyway, I think this change is for good since now I can query lots of things to read the parameters and something really ugly is now removed from our lives: We now can read indexed parameters with numbers and not with string-numbers. We also have the chance to read the parameters converted as different types in a much more elegant way.

Here is an example of how parameters can be read:
 public class HomePage extends WebPage {  
private static final long serialVersionUID = 1L;

public HomePage(PageParameters params) {

//build a list of the page parameters:
ArrayList<String> stringList = new ArrayList<String>();

int indexed = params.getIndexedCount();

//go through the indexed page parameters
for (int i = 0; i < indexed; i++) {
stringList.add(i + ": " + params.get(i).toString());
}

//go through the named page parameters
for (String key : params.getNamedKeys()) {
stringList.add(key + ": " + params.get(key).toString());
}
...
}
}

Servlet 3 Integration.
Wicket 1.5 wont have integration with servlet 3 but I've managed to use servlet3-style configuration for the wicket filter, the way it's done is less than ugly and I hope they add servlet 3 support in the future at least in the form of a separate project.

Here's how I did it:
 package com.juancavallotti.wicket15;  

import javax.servlet.annotation.WebInitParam;
import javax.servlet.annotation.WebFilter;
import org.apache.wicket.protocol.http.WicketFilter;

/**
* This is a dummy subclass of filter to allow servlet 3.0 style config.
* @author juancavallotti
*/
@WebFilter(urlPatterns = "/*", initParams = {
@WebInitParam(name = "applicationClassName",
value = "com.juancavallotti.wicket15.DemoWicketApplication"),
@WebInitParam(name = "filterMappingUrlPattern",
value = "/*")
})
public class MyWicketFilter extends WicketFilter {
}


Wednesday, May 18, 2011

Setting up maven to use local JAR Libraries

Since the very first time I've started using maven (and as a previous ANT user) I wondered how I could achieve the only thing that ANT does great: Add manually my own libraries.

The answer is easy: install them into the local repository. But that's not so easy! If someone new joined the project, he would have to install the artifact also in his local repository and this is an extra step anyone could easily forget!

Another thing you could do is install nexus in some tomcat, and after a little bit of configuration install the jar and add the server url as a repository on my project, but... Isn't that a little bit of overkill for one or two JARS?

All the previous analysis already contains the solution: we need to do both: Add a repository, but the repository should be local... to the project and manually install the files there (and probably check them in into a repository).

And here is how you do It: First of all you need to know that you can add a file:// url as the url of the repository, so we can add something like this:
   <repositories> 
<repository>
<id>project</id>
<name>Project Maven Repository</name>
<layout>default</layout>
<url>file://${project.basedir}/lib/</url>
</repository>
</repositories>
And we take advantage of the variable referencing the project's directory: project.basedir.

So now we only need to copy artifacts installed manually from our local repository to our project repository (or better install them directly into the project repository). And that's it your project build will still be flawless and you won't have to worry about putting nexus to work or remind your new co-workers to install the artifact.

Sunday, May 15, 2011

Wicket 1.4 URL Character Encoding Problems

While developing web apps using wicket I've faced a problem with character encoding on URLs, for example, if you are using default settings and deploying your application into Tomcat, you'll be able to reproduce the issue quite simply:
  • Create a page that prints somewhere a parameter read from the url (on standard query string url coding strategy).
  • Call the page directly from the browser using some special char on the parameter value.
  • Check that the special char has been decoded wrongly and you're scratching your head ;) on how to solve this out.
So my first thought was "this for sure is a wicket issue!" but soon learned the problem is much deeper than that. It turns out that most browsers don't tell to the server the encoding in which they're making the request so it's up to the server to guess this.

Modern browsers can send (and they actually do) make the requests in UTF-8 but most of the containers assume (because it's what you can read in the HTTP protocol RFC) that the encoding is by default ISO-8859-1. From the HTTP protocol definition:
The "charset" parameter is used with some media types to define the character set (section 3.4) of the data. When no explicit charset parameter is provided by the sender, media subtypes of the "text" type are defined to have a default charset value of "ISO-8859-1" when received via HTTP.
Ok, now, wicket has a lot of things you can set up on the web application, one of all is the request cycle character encoding, and it defaults to UTF-8, so this leads us to the first solution to our problem.

The first solution: Change the request cycle character encoding.

This can be done in a very simple way, with just a line of code:
 getRequestCycleSettings().setResponseRequestEncoding("ISO-8859-1");
By doing this, you tell wicket to treat requests and responses as they were in ISO-8859-1 and special characters on the URL get url-encoded and everything works just fine. I have though some suspicions that some strings with special characters get broken but I really can't confirm that (because it could be they get broken for some other reason).

Now, I don't know you but I really don't feel comfortable with having my request and response on ISO-8859-1, specially because I like UTF-8. So since the problem is that the container assumes the requests are in ISO-8859-1 why not tell the container to assume the requests will be by default on UTF-8?

The second solution: Let the container assume the requests are in UTF-8.

To make this solution work we'll need to have access to the production server's configuration, and it's quite easy: tomcat's http connector has a property called URIEncoding, we just need to set that up and all set:
 <Connector port="8080" protocol="HTTP/1.1"  
connectionTimeout="20000"
redirectPort="8443" URIEncoding="UTF-8" />
This solution is quite pretty and works like a charm as well, and you can stick with your beloved UTF-8 charset.

I have a third solution but isn't pretty.

The third solution: Write your own QueryStringURLCodingStrategy

This solution is what I've fell down when I first met the issue because I thought it was a wicket issue and was exactly that: subclassing QueryStringURLCodingStrategy and write my own implementation of the decode parameters method and decode the parameters yourself!. At the time it worked, but now I can see it just have a lot of side problems so I think you want to stay away from this solution.

Other solutions that didn't work for me.

While trying to solve this problem I also tried other solutions without luck: some tried writing a servlet filter to set the encoding of the request to UTF-8 including the filters provided by the spring framework and apache tomcat. I also wrote my own implementation of a filter to change the encoding with no luck (the problem didn't go away). But also I think it's worth a try.

Friday, May 13, 2011

Using JAX-B to parse XML files without DTD or XSD

XML parsing is one common task for any developer, specially in Java. For any beginner looking how to do this it's very easy to find on internet lots of articles showing how to parse XML using a DOM parser or worse, a SAX parser!

Both DOM and SAX parsers are very powerful and general tools but even to parse simple things you need to write tons of code. For simple XML parsing (and writing) Java has the JAX-B API. JAX-B stands for Java Architecture for Xml Binding.

Even though there are tons of JAX-B tutorials on the internet, most of them start by building a XSD file and generating with the IDE, a maven plugin, (or another tool), the matching object model for the XML structure, and automatically get the binding of the classes by adding some Java annotations.

There are some situations where we don't want to do this:
  • We don't have the DTD or XSD available.
  • The DTD or XSD is outdated.
  • We really don't want to write a DTD or XSD for a simple domain-specific file that we won't re-use!
Using JAX-B is pretty straightforward but it has some concepts and terms we need to know first:
  • Marshalling: Is the process of converting a Java object into an XML representation.
  • Unmarshalling: Is the process of converting an XML file into a Java object.
For that matter, Java provides us with two interfaces and one factory class:
  • Marshaller
  • Unmarshaller
  • JAXBContext
And also it provides a huge set of annotations to allow us to bind a data model with an XML representation. So let's get started!

The following snippet show's the XML file we will be parsing:

<?xml version="1.0" encoding="UTF-8"?>
<movie-backup-index>
    <file-info lastBackup='2011-04-02' totalMovies='4'/>
    <media-list>
        <disc label="disc1">
            <movie>The Hulk</movie>
            <movie>Thor</movie>
        </disc>
        <disc label="disc1">
            <movie>Iron Man</movie>
            <movie>Captain America</movie>
        </disc>
    </media-list>
</movie-backup-index>

So the first thing we need is a class that will contain this structure, let's call it MovieIndex, and we'll add a few annotations to it. Since we want to work with JavaBeans we'll tell JAX-B to use the getters and setters of the class:
@XmlRootElement(name="movie-backup-index")
@XmlAccessorType(XmlAccessType.PROPERTY)
public class MovieIndex implements Serializable {

}

Now we have our first step, next we need to model the file information tag. We can do several things like adding an internal class or creating a new public class (or other ways of defining a class) but since this is a potential API ;) I'll create another public class: MovieIndex Info, and will add some annotations to it:

@XmlRootElement(name="file-info")
@XmlAccessorType(XmlAccessType.PROPERTY)
public class MovieIndexInformation implements Serializable {
    private Date lastBackup;
    private Integer totalMovies;
    public void setLastBackup(Date lastBackup) {
        this.lastBackup = lastBackup;
    }
    public void setTotalMovies(Integer totalMovies) {
        this.totalMovies = totalMovies;
    }
    @XmlAttribute
    public Date getLastBackup() {
        return lastBackup;
    }
    @XmlAttribute
    public Integer getTotalMovies() {
        return totalMovies;
    }
}


With the XmlAttribute we instruct JAX-B to read the data as an attribute instead of a child element. Now we need to create a model for our backup media and add some annotations:

@XmlRootElement(name="disc")
@XmlAccessorType(XmlAccessType.PROPERTY)
public class Media implements Serializable {
    private String label;
    private List<String> movies;
    @XmlAttribute
    public String getLabel() {
        return label;
    }
    @XmlElement(name="movie")
    public List<String> getMovies() {
        return movies;
    }
    public void setLabel(String label) {
        this.label = label;
    }
    public void setMovies(List<String> movies) {
        this.movies = movies;
    }
}


Ok, now we have all we need so we can add all the remaining elements to our MovieIndex class:

@XmlRootElement(name="movie-backup-index")
@XmlAccessorType(XmlAccessType.PROPERTY)
public class MovieIndex implements Serializable {
    private MovieIndexInformation fileInfo;
    private List<Media> media;
    
    @XmlElement(name="file-info")
    public MovieIndexInformation getFileInfo() {
        return fileInfo;
    }
    
    @XmlElement(name="disc")
    @XmlElementWrapper(name="media-list")
    public List<Media> getMedia() {
        return media;
    }
    public void setFileInfo(MovieIndexInformation fileInfo) {
        this.fileInfo = fileInfo;
    }
    public void setMedia(List<Media> media) {
        this.media = media;
    }
}

We've used the XmlElementWrapper annotation because we have an extra element that wraps our list of discs, so to avoid creating a new type with only a list, we have this annotation.

So we're ready to parse!! In order to quickly test, I've added the toString methods on the model objects, (I won't show it here because it's Netbeans-generated.

So now we need to add the boilerplate code to bootstrap the JAXBContext and to un-marshall our file:

public class JAXBDemoParse {
    /**
    * In this Main method we will be parsing an XML file into a Java Object using
    * the JAXB library included in the JDK.
    * @param args
    */
    public static void main(String[] args) throws Exception {
        //bootstrap the context.
        JAXBContext context = JAXBContext.newInstance(MovieIndex.class);
        //create an unmarshaller.
        Unmarshaller unmarshaller = context.createUnmarshaller();
        //parse the xml file!
        InputStream is = JAXBDemoParse.class.getResourceAsStream("demoXML.xml");
        MovieIndex index = (MovieIndex) unmarshaller.unmarshal(is);
        System.out.println(index);
    }
}

So finally!! We ended up loading all the data from the XML file into the object in only 3 lines of code!! and some annotations. Here is the program output, please notice how the dates on the xml attribute got parsed the right way, JAXB handled all the data conversion.

 MovieIndex{
  fileInfo=MovieIndexInformation{
      lastBackup=Sat Apr 02 00:00:00 GMT-03:00 2011,
      totalMovies=4},
  media=[
      Media{
          label=disc1,
          movies=[The Hulk, Thor]},
      Media{
          label=disc1,
          movies=[Iron Man, Captain America]
      }]
}

I've added some enters and tabs to the output so it can be better read by humans.

So that's all for now. One final note, if you would like to marshall the object to an XML file you ask the JAXBContext for a marshaller and just call the method with the object and an output stream.