Sunday, June 26, 2011

Spring AOP Scoped Proxies

In this post I'll be discussing the Spring AOP Scoped Proxies as a way to expand the scope of the beans managed by the spring IoC container. So far we know two types of scopes common to the IoC container: Singleton, just one instance per container, and Prototype, one instance per client (of the bean). The previous two scopes can give us an idea of stateless/stateful beans but in some context there are other contexts that can be useful, for example in a web application we can think on the scope of a request or the scope of a session to make parts of the application that only makes sense on a web context.

It's true that the right thing to do when we're designing our backend is to try and do the whole functionality as independent of the context as possible but sometimes having a bean that depends on the context makes the application logic so simple, elegant and easy to code that we're tempted to make things that way, for example, if we're coding an application logic that depends a lot on the information of the currently logged user it would be really handy to have in our bean something like this:
 @Autowired
private CurrentUser currentUser
And then get the data as we please. But the thing is with the prototype scope or singleton scope it would be very difficult to achieve this, specially when a lot of users ar accessing the app simultaneously. So to this purpose we'll configure the AOP scoped proxies.

First of all, we'll speak about the dependencies we need:
  • Spring AOP, to have the AOP functionality in our application.
  • CGLIB if we're going to have proxies for classes that doesn't implement any interface.
Then, we'll have our standard configuration but apart from that, some special configuration so spring can tell which request matches to which thread and thus access the session and request scopes.

We'll add the following lines in our web.xml file:
   <listener>
<listener-class>org.springframework.web.context.request.RequestContextListener</listener-class>
</listener>
Finally we configure the bean to be session scoped or request scoped:

 @Service
@Scope(value="session",proxyMode= ScopedProxyMode.TARGET_CLASS)
public class CurrentUser implements Serializable {
//session data here
}

If we're configuring our beans in the XML fashion, then we add the tag:
 <bean ... scope="session"> 
<aop:scoped-proxy/>
</bean>
To our bean definition and that's it. Really easy and really clean because our bean logic doesn't get dirty with Servlet spec classes and if we need to switch this logic to be for instance a desktop application, we can always switch the bean to be singleton and take care of it by ourselves.

Monday, June 20, 2011

How to Integrate Spring with GWT Servlet

One thing you may be wondering when you start a new (and maybe your first) GWT project using spring framework on the back-end is how can we autowire the remote service servlets with the Service beans on the backend?

There are many ways to achieve this, but my favorite is very simple and direct, and it may be a great solution if you're looking on how to autowire a servlet too, and is to create a new superclass for all our RemoteServiceServlets, I called that superclass SpringServiceServlet, and it looks like this:
 package com.juancavallotti.server;  

import com.google.gwt.user.server.rpc.RemoteServiceServlet;
import javax.servlet.ServletConfig;
import javax.servlet.ServletException;
import org.springframework.web.context.support.WebApplicationContextUtils;

/**
*
* @author juancavallotti
*/
public class SpringRemoteServiceServlet extends RemoteServiceServlet {
private static final long serialVersionUID = 1L;

@Override
public void init(ServletConfig config) throws ServletException {
super.init(config);
WebApplicationContextUtils
.getRequiredWebApplicationContext(getServletContext())
.getAutowireCapableBeanFactory()
.autowireBean(this);
}

}

So from now on, we just extend this class when writing our services and we get full autowire capabilities.

Hope you find it useful.

Sunday, June 12, 2011

List Edit Form in Wicket 1.5


I had some spare time to have further fun with wicket 1.5 and I came up with this mini-howto to create a multiple-item edit form, this is very simple to do in some frameworks but I think in wicket is easier! So let's get started.

The final result will look like the following image:
It's a simple table that has an add Item button to add an extra row to enter contact information, and the submit button which is supposed to do something interesting with the data.

First of all, here is the HTML file, pretty standard stuff:

 <!DOCTYPE html>  
<html>
<head>
<title></title>
<meta http-equiv="Content-Type" content="text/html; charset=UTF-8">
</head>
<body>
<h1>List Edit Form</h1>
<form wicket:id="multiform">
<table>
<thead>
<tr>
<th>Name</th>
<th>Last</th>
<th>Email</th>
</tr>
</thead>
<tbody>
<tr wicket:id="forms">
<td><input type="text" wicket:id="name" /></td>
<td><input type="text" wicket:id="lastName"/></td>
<td><input type="text" wicket:id="email"/></td>
</tr>
</tbody>
</table>
<button type="submit" wicket:id="addItemButton">Add Item</button>
<button type="submit" wicket:id="doSomethingUseful">Submit</button>
</form>
</body>
</html>

As we can see, we have the form fields on the table, bound with wicket ids, and obviously the row has an id to match a wicket iterator component and of course the form has an id too.

We'll be editing contacts so we create a contact bean to hold the important information for the contacts, here I show only the attributes but imagine that this bean should have getters and setters for the attributes and it's better if you implement equals and hash code.

   
public class Contact implements Serializable {
private static final long serialVersionUID = 1L;
private String name;
private String lastName;
private String email;
....
}

Now let's take a look at the code for the page:

 package com.juancavallotti.wicket15.forms;  

import java.util.ArrayList;
import java.util.List;
import org.apache.wicket.ajax.AjaxRequestTarget;
import org.apache.wicket.ajax.form.AjaxFormSubmitBehavior;
import org.apache.wicket.ajax.markup.html.form.AjaxSubmitLink;
import org.apache.wicket.markup.html.WebPage;
import org.apache.wicket.markup.html.form.Form;
import org.apache.wicket.markup.html.form.SubmitLink;
import org.apache.wicket.markup.html.form.TextField;
import org.apache.wicket.markup.html.list.ListItem;
import org.apache.wicket.markup.html.list.ListView;
import org.apache.wicket.model.PropertyModel;

/**
*
* @author juancavallotti
*/
public class MultiFormPage extends WebPage {

private static final long serialVersionUID = 1L;
private List<Contact> contacts;

public MultiFormPage() {

contacts = new ArrayList<Contact>();
final Form multiform = new Form("multiform");
multiform.setOutputMarkupId(true);

//the list of items
multiform.add(new ListView("forms", new PropertyModel(this, "contacts")) {

private static final long serialVersionUID = 1L;

@Override
protected void populateItem(ListItem item) {

item.add(new TextField("name", new PropertyModel(item.getModelObject(), "name")));

item.add(new TextField("lastName", new PropertyModel(item.getModelObject(), "lastName")));

item.add(new TextField("email", new PropertyModel(item.getModelObject(), "email")));
}
});

//actions for the add item button
multiform.add(new AjaxSubmitLink("addItemButton") {

private static final long serialVersionUID = 1L;

@Override
protected void onSubmit(AjaxRequestTarget target, Form<?> form) {
contacts.add(new Contact());
target.add(multiform);
}

@Override
protected void onError(AjaxRequestTarget target, Form<?> form) {
target.add(multiform);
}
});

//actions for the submit button
multiform.add(new SubmitLink("doSomethingUseful") {

private static final long serialVersionUID = 1L;

@Override
public void onSubmit() {
System.out.println(contacts);
}
});

add(multiform);
}
}


Here we create the form, and add to it a list view, in the list view we populate the item with text fields and a property model that will perform the actual magic when the form is submitted.

Then we add the button to create new items, which is responsible for adding a new contact on the contact list and repainting the whole form on the client.

And finally we add the button to submit the form to hopefully someday do something interesting with the bunch of contacts the users will input.

Reflecting the data changes Immediately

An enhancement for this would be to reflect data changes as soon as the user makes them. This only requires a small code change. We add for each text field an ajax submit behavior for the event "blur" and that's it, the following snippet shows how to do it.

       @Override  
protected void populateItem(ListItem item) {

item.add(new TextField("name", new PropertyModel(item.getModelObject(), "name"))
.add(new BlurSubmitBehavior(multiform)));

item.add(new TextField("lastName", new PropertyModel(item.getModelObject(), "lastName"))
.add(new BlurSubmitBehavior(multiform)));

item.add(new TextField("email", new PropertyModel(item.getModelObject(), "email"))
.add(new BlurSubmitBehavior(multiform)));
}

   class BlurSubmitBehavior extends AjaxFormSubmitBehavior {  
private static final long serialVersionUID = 1L;

public BlurSubmitBehavior(Form form) {
super(form, "onblur");
}

@Override
protected void onSubmit(AjaxRequestTarget target) {
//we do nothing but we could do something interesting
System.out.println(contacts);
}

@Override
protected void onError(AjaxRequestTarget target) {
}
};


That's all for now, hope you find it useful.

Sunday, June 5, 2011

How to integrate Maven, GWT and Netbeans IDE

On the past I've created a web application based on GWT and in Netbeans IDE. I have to say it was a total nightmare! The version of GWT I worked with is 1.7, now things have changed, version 2.x is here for a long time and there are many tools to work with it.

A piece of advice.
For those who want to start a new GWT project, I still encourage them to use Eclipse IDE with the Google Plugin, the sad truth is eclipse is really MUCH better to work with GWT than Netbeans and has many tools such as visual designers and wizards to do things easy and all of that. Nevertheless, if you use maven you can work with both IDE's and take the best from both worlds!

Let's get started.
First of all you will want to have some help with code editing, refactoring, creating new files out of a template and so on, to do this you want to install the GWT4NB plugin, this plugin can be easily installed on the Netbeans plugin manager or downloaded from the Netbeans page.

This plugins enables the IDE with very helpful stuff, it also works fairly well with maven and ant projects. To use ant you should download the GWT SDK and instruct the plugin on where to find it.
Maven Dependencies
Now we want to have the actual GWT libraries to start coding our application, so we need to include two important dependencies:
  • gwt-user: With this dependency we have the core GWT API, we may choose the version we like but the important thing is the scope of this library, we will add this library as provided because we'll only use it when compiling gwt code to javascript, if we don't set this dependency to provided, it will end up on the final WAR making it heavier.
  • gwt-servlet: We need this to process RPC requests and it isn't really used on development so we'll set the scope for this dependency to runtime.
     <dependency>
<groupId>com.google.gwt</groupId>
<artifactId>gwt-servlet</artifactId>
<version>${gwt.version}</version>
<scope>runtime</scope>
</dependency>
<dependency>
<groupId>com.google.gwt</groupId>
<artifactId>gwt-user</artifactId>
<version>${gwt.version}</version>
<scope>provided</scope>
</dependency>
Now that we have the GWT dependencies and we have no more problems to compile our JAVA code, we need a way to compile the client code into Javascript. Also we need a way to start GWT development mode to be able to test our code, to do this we'll use the Maven GWT plugin.

We can hook (or not) the Maven GWT plugin into our lifecycle, but the very annoying thing of working with GWT on Netbeans (at least for previous releases) is the fact that you end up compiling the GWT client side as many times as you compile the application, and believe me you don't want to waste two extra minutes of your life for each build, so I removed the build hook.
You can fire at will the gwt client side code compilation using the goal gwt:compile of the maven GWT plugin.
       <plugin>
<groupId>org.codehaus.mojo</groupId>
<artifactId>gwt-maven-plugin</artifactId>
<version>2.2.0</version>
<executions>
<execution>
<goals>
<!-- remove this to not compile gwt client every time -->
<goal>compile</goal>
<goal>test</goal>
</goals>
</execution>
</executions>
<configuration>
<hostedWebapp>${project.build.directory}/${project.build.finalName}</hostedWebapp>
</configuration>
</plugin>
Running and Debugging in Development Mode
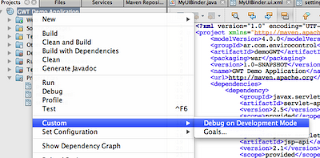
Something brilliant about development mode is the possibility to change code and see the changes as soon as you reload the browser, so we obviously want the ability to do that. The maven GWT plugin provides us with two goals to start the development mode: gwt:run and gwt:debug.

If we choose to use the gwt:debug goal, then the plugin tells us the parameters to attach out JPDA debugger to the hosted mode, and then set breakpoints at will.

Pitfalls and Gotchas
There are some pitfalls and gotchas when working with GWT. The most important one is: If you plan to use a J2EE full profile container (and with it use EJBs and persistence), my advice is: Do not use GWT, or use it in a way you lookup EJBs using JNDI. This is because GWT development mode deploys the application on a Jetty server who knows nothing about EJBs and such. A better solution would be to use the spring framework, not only because it's better but the spring framework doesn't have any problem on running on jetty.

That's all for now, hope you find it helpful.

Thursday, June 2, 2011

How to know the Seniority level of a Developer?

One tough thing to do when looking to hire an employee is to tell with some level of certainty to which of these three famous groups of seniority belongs, I'm talking of course of the "Junior" "Semi Senior" and "Senior" groups.

Many people take in account the years of experience, some others combine this with some questions of framework-related knowledge, problem solving capability and others ask very specific questions about weird constructions on the language that probably are never used even in huge applications.

Truth is no one knows for sure what makes a developer member of one of the seniority groups. I've had the chance to interview many people on my career and also have been interviewed several times so I'll try to explain in the following lines my take of what is the evolution for developers.

The four Stages
When somebody start with the ways of development it goes through four stages but it doesn't depend on the time (only) to go through them or the experience in a single project or technology but the will of the person to IMPROVE. I put the word in capitals because this is the key on the whole process, you can have like 10 years or more in one technology, language, platform, tool, etc, but if you don't have the will to improve, you'll still be considered a Junior. Obviously over time that person will gain some knowledge so time does matter and it matters a lot! But let's start with the stages.

The programming stage: in this stage this guy realizes that he understands the programming language and has the ability to print messages on the screen at will!! :O it also notices that he can make sense of a graphic UI design tool and write code behind some buttons or read textfields. This guy maybe want's to start earning some money with his apps and with luck he does. People who are on this stage are AMATEURS, they aren't really acknowledged as professionals but they make their way and build some apps.

The designing stage: if this amateur guy want's to improve it will soon learn that he's writing a lot of duplicated code, he feels that he's writing always the same thing to achieve similar behaviors so he begins developing interest for design patterns and pre-built things to ease things a bit. Also at this point he has some knowledge of what's going on, he is going beyond recipes, he is starting on the professional side. People on this stage can be considered JUNIORS, they have some foundation knowledge use a lot of pre-built things, and love recipes. These guys now can achieve things, in fact they can achieve many things and they really do! but there's still a long way of maturity and improvement left.

The deciding stage: After doing a lot of applications as junior using pre-defined recipes and tricks, these developers are starting to be very productive with the development tools, have some deeper understanding of how frameworks work and also now it's easy to learn how new frameworks work, so they become SEMI-SENIOR they now can tell why they're doing what they're doing. They now care about the performance of the application, they know most of the good practices of the programming language and can solve some complex programming problems.

The quality stage: One of the most hard things to do is to tell between a semi-senior developer and a senior one, but think about evolution! These semi-senior developers want to improve and they now can work very comfortable in small and big projects but they realize that the code doesn't go away as soon as they deliver. They start thinking on how the code they're writing right now will look on the future. They think about quality! they want to make things readable, they want to be able to re factor without breaking things they can foresee problems and solve them before they happen so all of these makes them to produce really good code easy to read, complex application logic that your grandma can understand! These guys are SENIOR, and they start delivering code with increasingly high quality well designed, well documented, effective, etc.

This is my take on seniority after several hours of thinking, my aim is to share and discuss what seniority means in development, feel free to post comments on the subject.