Showing posts with label Back End. Show all posts

Saturday, May 18, 2013

How to build a cloud connector for Mule ESB

I'm working on a particular project which uses Mule ESB as a central piece, for adding a new feature to my project I need to consume Google's custom search API so for making it beautiful I'm going to create a connector using Mule's DevKit and showing step by step the process of building a connector that consumes a REST API.

First, I create a DevKit module from the archetype:

mvn archetype:generate -DarchetypeGroupId=org.mule.tools.devkit -DarchetypeArtifactId=mule-devkit-archetype-generic -DarchetypeVersion=3.4.0 -DarchetypeRepository=http://repository.mulesoft.org/releases/ -DgroupId=com.mycompany -DartifactId=mule-module-google-custom-search -Dversion=1.0.0-SNAPSHOT -DmuleVersion=3.4.0 -DmuleModuleName=GoogleSearch -Dpackage=com.mulesoft.module.googlesearch -DarchetypeRepository=http://repository.mulesoft.org/releases

Since I'm building a cloud connector for google's custom search API it is handy to have it's reference at hand:

https://developers.google.com/custom-search/v1/cse/list 

You may also want to create a custom search engine:

http://www.google.com/cse/create/new

Lastly: here is the link for the source code of the project:

https://github.com/juancavallotti/mule-module-google-custom-search

Now let's the coding begin! First of all I want to clean up the sample module, pretty much removing everything except the class and it's annotations. I have picked to be a module (instead of a proper connector) because it's a fair simple functionality which does not require work for setting up a connection. The class looks like this:

1
2
3
4
5
6
7
8
9
/**
 * Google custom search Module.
 *
 * @author Juan Alberto López Cavallotti.
 */
@Module(name="google-search", schemaVersion="1.0.0-SNAPSHOT")
public class GoogleSearchModule {

}

So first we will add the required configuration parameters as stated at the documentation, these parameters are the API Key, and the custom search engine ID or it's url (one of both are required). The search query is also required but we'll save it for passing it as a parameter to the only operation this connector will have. I will give nice names to these parameters instead of the really short ones they currently have, this way is more self-documented.


 1
 2
 3
 4
 5
 6
 7
 8
 9
10
11
12
13
14
15
16
@Module(name="google-search", schemaVersion="1.0.0-SNAPSHOT")
public class GoogleSearchModule {

    @Configurable
    private String apiKey;

    @Configurable
    @Optional @Default("")
    private String searchEngineId;

    @Configurable
    @Optional @Default("")
    private String searchEngineUrl;

    //getters - setters
}


DevKit demands us to write javadoc for each element on the class so it is able to generate the connector's documentation properly. I won't show this documentation on this post unless I have something to say about it, having said that, you might want to take a look at the final version of this module in order to get more insight on its development.

Next, I want to create the one and only operation as a method of this module definition, this method has a lot of parameters, most of all with default values. For me this is pretty ugly and DevKit allows me to do better so I will do, I will pick the most important parameters for direct setting and the others would be gathered through a POJO. The return value I will keep it as the JSON String the service returns (for the sake of simplicity) but kind of more beautiful would be to create an Object Structure and take advantage that Mule has bundled the Jackson Library.


 1
 2
 3
 4
 5
 6
 7
 8
 9
10
11
12
13
14
15
16
17
/**
 * Perform a Google custom search.
 *
 * {@sample.xml ../../../doc/GoogleSearchModule-connector.xml.sample google-search:search}
 *
 * @param query The search query to send to google search.
 * @param siteSearch The site where to search.
 * @param searchType The type of the search to be performed.
 * @param searchConfiguration Configuration for this google search.
 *
 * @return The JSON result as returned by the google custom search API.
 */
@Processor
public String search(String query, @Optional @Default("") String siteSearch, 
                     @Optional SearchType searchType, @Optional SearchConfiguration searchConfiguration) {
    return null;
}


You need to consider the following:

  • The method must be annotated with one of the annotations provided by devkit to generate different types of message processors. (Each type has its own signature requirements).
  • Every operation should be documented properly.
  • You need to create a sample usage of the operation on the sample file, (which luckily it gets created by the archetype).
  • You need to document EVERY parameter if you wish the build to succeed.


<!-- BEGIN_INCLUDE(google-search:search) -->
<google-search:search query="#[header:inbound:query]" />
<!-- END_INCLUDE(google-search:search) -->

Now, the sample XML looks like the following:


I want to perform an initial configuration and validation when the module starts just to make sure we're ready to go when making a search so I create a method to take advantage of the configuration element lifecycle:

 1
 2
 3
 4
 5
 6
 7
 8
 9
10
11
12
13
14
15
16
17
18
19
20
21
22
private HashMap<String, String> connectorConfigs;
 
/**
 * Perform module initialization.
 */
@Start
public void initializeConfiguration() {
    connectorConfigs = new HashMap<String, String>();
 
    connectorConfigs.put("key", apiKey);

    if (StringUtils.isBlank(searchEngineId) && StringUtils.isBlank(searchEngineUrl)) {
        throw new IllegalArgumentException("You must configure either searchEngineId or searchEngineUrl");
    }
 
    if (StringUtils.isNotBlank(searchEngineId) && StringUtils.isNotBlank(searchEngineUrl)) {
        throw new IllegalArgumentException("You must configure a reference to the custom search engine.");
    }
 
    addIfNotBlank(connectorConfigs, "cx" , searchEngineId);
    addIfNotBlank(connectorConfigs, "cref", searchEngineUrl);
}


This basically creates a map that will be the base parameters for every request. Every request should have at least a reference to the API key (which is the way google charges us for our searches) and the reference to our custom search engine (which we need to create manually in order to use the API).  


Next, let's dig into the actual implementation. I will want to access the MuleEvent for this message processor so, I will modify slightly the signature of the method. What this implementation does is: create a map with the parameters to send to the API, then convert these maps into the API url and finally dispatch it through Mule's HTTPS connector. This is very convenient since it allows the configuration of the HTTPS connector parameters even though there is still room for improvement!! I could have made the http connector to use configurable but I won't just to keep it simple. The search method now looks like this:


 1
 2
 3
 4
 5
 6
 7
 8
 9
10
11
12
13
14
15
16
17
18
19
20
21
22
23
24
25
26
27
28
@Processor
@Inject
@Mime("application/json")
public String search(MuleEvent event, String query, @Optional @Default("") String siteSearch,
                     @Optional @Default("WEB_SEARCH") SearchType searchType, @Optional SearchConfiguration searchConfiguration) {
 
    MuleContext context = event.getMuleContext();
 
    MuleMessage message = event.getMessage();
 
    HashMap<String, String> searchParams = buildSearchParams(query, siteSearch, searchType, searchConfiguration);
 
    String apiUrl = buildSearchUrl(searchParams);
 
    try {
        OutboundEndpoint endpoint = context.getEndpointFactory().getOutboundEndpoint(apiUrl);
 
        //configure the message.
        message.setOutboundProperty("http.method", "GET");
 
        MuleEvent responseEvent = endpoint.process(event);
        //return the payload.
        return responseEvent.getMessage().getPayload(String.class);
    } catch (MuleException e) {
        logger.error("Error while querying the google custom search API", e);
    }
    return null;
}

This is pretty straightforward. I won't get into the implementation of the auxiliary methods because it is just boilerplate. I want to highlight the @Inject annotation I used, this is used to get the actual MuleEvent (and distinguish this parameter from what the user needs to provide) and also the @Mime annotation which will generate the appropriate message header.

Now we just want to create the MuleStudio update site so we can install and try this module:

mvn clean package -Ddevkit.studio.package.skip=false

We can import this through update site and use it! There are furhter configurations I can (and probably will) make to this connector, DevKit has annotations for customizing the studio dialogs and much more!!

Here is a sample project which uses the recently created connector:


<mule xmlns:http="http://www.mulesoft.org/schema/mule/http" xmlns:google-search="http://www.mulesoft.org/schema/mule/google-search" xmlns="http://www.mulesoft.org/schema/mule/core" xmlns:doc="http://www.mulesoft.org/schema/mule/documentation" xmlns:spring="http://www.springframework.org/schema/beans" version="EE-3.4.0" xmlns:xsi="http://www.w3.org/2001/XMLSchema-instance" xsi:schemaLocation="http://www.springframework.org/schema/beans http://www.springframework.org/schema/beans/spring-beans-current.xsd
http://www.mulesoft.org/schema/mule/core http://www.mulesoft.org/schema/mule/core/current/mule.xsd
http://www.mulesoft.org/schema/mule/http http://www.mulesoft.org/schema/mule/http/current/mule-http.xsd
http://www.mulesoft.org/schema/mule/google-search http://www.mulesoft.org/schema/mule/google-search/1.0.0-SNAPSHOT/mule-google-search.xsd">
    
    <google-search:config name="Google_Search" apiKey="<api key>" searchEngineId="<engine id>" doc:name="Google Search"/>
    
    <flow name="mule-configFlow1" doc:name="mule-configFlow1">
        <http:inbound-endpoint exchange-pattern="request-response" host="localhost" port="8081" doc:name="HTTP"/>
        <google-search:search config-ref="Google_Search" query="http connector" doc:name="Google Search" />
        <logger level="ERROR" message="Payload is: #[payload]" doc:name="Logger"/>
        <logger level="ERROR" doc:name="Logger"/>
    </flow>
</mule>

Please continue reading the  DevKit cookbook for much more info:

http://www.mulesoft.org/documentation/display/current/Cloud+Connector+Devkit+Cookbook

Tuesday, May 14, 2013

How To Unit-Test an Annotation Processor

The Issue

I have been developing lately an annotation processor and found that unit-testing it is not as trivial as it might sound.

Some would say "You just need to mock all of the java.lang.model.* packages and that's it!" Unfortunately mocking these elements is not as easy as it might appear and I don't really find a reason why to do this other than speeding up the test suite, this alternative has to be taken real seriously and prioritize the test time / development effort.

The solution

The path I went through is invoking the Java compiler within my unit tests. Doing this is kind of straightforward but some considerations must be taken.

  • In order for the tests to be repeatable, please make sure your working directory is invariant, maven does a good job at this.
  • It's easier if your annotation processor can be auto-discovered. This is place the appropriate "javax.annotation.processing.Processor" file on META-INF/services/
  • Make sure you delete the junk files after you have tested. Since we're going to compile classes some .class files may appear, it is not mandatory to delete them but they would get mixed with the source code which is not nice at all.
Now that we've taken care of the errands, I present you a generic annotation processing test case which you can use for your unit tests.

Please note that this is not the only (or strictly the best) way of doing this but is a way and I like it so, here is the code:


First, we have a simple interface which we will implement to build our test cases, implementations return the list of files to compile and then might verify if the compilation has failed of there were some compilation messages.

Next, we have a really simple sample implementation of a smoke test which verifies that no "Critical Warnings" or "Compiler Errors" have been issued from a valid configuration.

Finally we have the test class. For this I make use of the parameterized test runner that JUnit 4 provides and the parameters are exactly the different implementations of our simple interface.

Please note that in order to be completely generic, this unit test must obtain its parameters from configuration nevertheless I made it like this for the sake of simplicity and just keeping note of the room for improvement.

After this it is just boilerplate code, get the compiler, configure the file manager, compiling the relevant files, invoking the test and finally cleaning up after ourselves.

Please feel free to modify or upgrade this test case and I hope you find it as useful as it is to me. 

Sunday, October 7, 2012

Enterprise Integration with Mule ESB

Why Enterprise Integration?

Beginning on the 90's, having a computer information system is a must for any company; even small drugstores have their own information system; also, starting from the 2000's, having a website is a must for most companies. Nowadays there are lots of online businesses and companies who own a huge ecosystem of applications, websites and third party systems.

In this scenario, one thing naturally emerged: information and business processes is fragmented!

Building a completely new application to mitigate this fragmentation is not practical on most cases so, what should a company do?

The answer is quite simple, something there must be on the middle whether people or software and there is where enterprise integration comes into play.

There is on the Java world also a number of enterprise middleware vendors, some are Mule ESB and Apache Camel and today I'll try to demonstrate how to use the first one which is the one I know better.

Mule ESB

Mule is an open source enterprise service bus which aims to be powerful and simple at the same time. It is very configurable and rather complex integrations can be achieved in a matter of hours.

In order to use Mule ESB, the developer has two main options: It can be used as an application container (with deployment based on archives) or embedded inside a java application.

Every Mule ESB application consists of an XML file which combines a number of built-in building blocks to perform a specific integration task, this task has the name of "flow".

Mule also provides some visual tooling, an IDE based on Eclipse, called "Mule Studio" which greatly helps the developer, to create, package and deploy Mule applications, specially it has visual tooling to create interfaces making the learning curve really flat.

A Sample Mule Application 

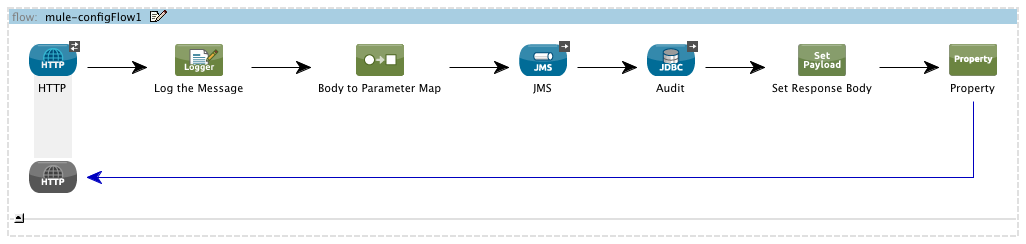
In order to explain further, let's take a look at a simple Mule Application, this application takes requests from http, logs some information, sends information through JMS and inserts records into a database. Any java developer knows that this task may take a couple of hours, but with Mule, this can be done in a matter of minutes. Here is how this application looks in Mule Studio:


Here we have defined a flow (integration), an application may have many flows; the first building block is an HTTP endpoint (called http inbound endpoint) and through the arrows travels a message (actually an instance of MuleMessage). This message contains headers and a payload (also other things such as attachments and other information), with each building block we'll be manipulating or extracting information from it.

I'll not cover in depth the concept of the message but is enough to say that this concept is key for understanding the tool. As an example, imagine a HTTP request, it has headers and a request body, the inbound endpoint will create a mule message with these request headers as the message headers and the request body as the payload. Now, for example, to send the message through JMS, the JMS outbound endpoint would create a JMS message with the Mule message headers as headers and the payload as the JMS payload.

The sample application looks on it's XML form like the following:

The first thing to note is the presence of connectors, these can be seen as a global configuration elements for each transport (in this case JMS and JDBC).

Next we can see the definition of the flow in which we just log the message; set the payload to be a hash map created out of the request query string; send this to an ActiveMQ broker; insert an audit record and finally build a generic JSON response, as you can see a lot is going on for so few configuration lines!

Mule ESB provides out of the box support for several transports such as HTTP, FTP, SMTP, IMAP, SOAP, REST, JMS, JDBC, etc and also ready-to-go clients (called cloud connectors) for popular cloud applications such as Facebook, Twitter, Salesforce and many more.

This completes this short introduction of this tool which is definitely worth looking into when it comes the time for integrating two or more applications.

Monday, August 27, 2012

Apache CXF Working with Spring

These days I have been playing with Apache CXF, which is great open source java-based library for creating both SOAP and REST web services. CXF is a great library, specially if you are using the Spring Framework and despite the outdated and inaccurate documentation, I managed to make it work and here is how to do it.

I have assembled a sample project which is on my GitHub repository.

A Small Introduction


CXF is designed with a very flexible architecture based on interceptors, this architecture allows the developer to make CXF work with different types of front end technologies such as JAX-WS, JAX-RS, CORBA and more!

CXF is also very friendly with the Spring framework so it is (or at least should be) very easy to integrate in this kind of applications.

Working with Maven

CXF artifacts are published on the central maven repository, so first of all, you need to add the dependencies into your project:


<dependency>
    <groupId>org.apache.cxf</groupId>
    <artifactId>cxf-rt-frontend-jaxws</artifactId>
    <version>${cxf.version}</version>
</dependency>
<dependency>
    <groupId>org.apache.cxf</groupId>
    <artifactId>cxf-rt-frontend-jaxrs</artifactId>
    <version>${cxf.version}</version>
</dependency>
<dependency>
    <groupId>org.apache.cxf</groupId>
    <artifactId>cxf-rt-transports-http</artifactId>
    <version>${cxf.version}</version>
</dependency>

At the moment of writing this post CXF latest version is 2.6.2. Also you need to include dependencies for the Spring Framework, please refer to the sample project for these.

Spring Configuration

To start with this little how to, I created a service class with has mixed JAX-WS and JAX-RS annotations. This makes easy to export the same functionality as SOAP and REST web services:


@WebService
@SOAPBinding(parameterStyle = SOAPBinding.ParameterStyle.BARE)
public interface MyWebService {

    @WebMethod
    String doSomeWork(String work);
    
    
    public String beRestful(String name);
    
    
    @WebMethod
    public ArrayList<Customer> findCustomers(CustomerRequest request);
}

And the implementation:


@WebService
public class MyWebServiceImpl implements MyWebService {
    
    @WebMethod
    @Override
    public String doSomeWork(String work) {
        return "Doing some work with this: "+work;
    }
    
    
    @Override
    @GET @Path("/beRestful") @Produces("text/plain") //REST Annotations
    @WebMethod //SOAP Annotations
    public String beRestful(@QueryParam("name") String name) {
        return "Your name is: "+name;
    }
    
    
    @WebMethod
    public ArrayList<Customer> findCustomers(CustomerRequest request) {
        
        
        ArrayList<Customer> ret = new ArrayList<Customer>();
        
        Customer customer = new Customer();
        
        customer.setCustomerName(request.getName());
        customer.setMembershipLevel(request.getMembershipLevel());
        customer.setCustomerSince(new Date());
        
        ret.add(customer);
        
        return ret;
    }
    
}


The Customer and CustomerRequest classes are pretty simple and therefore not shown here, please refer to the sample project for the source code.

These exposes three methods through SOAP and one through REST, CXF has its own XML namespaces for JAX-WS and JAX-RS, the header of the applicationContext.xml file looks like the following:


<beans xmlns="http://www.springframework.org/schema/beans"
       xmlns:xsi="http://www.w3.org/2001/XMLSchema-instance"
       xmlns:context="http://www.springframework.org/schema/context"
       xmlns:util="http://www.springframework.org/schema/util"
       xmlns:p="http://www.springframework.org/schema/p"
       xmlns:jaxws="http://cxf.apache.org/jaxws"
       xmlns:jaxrs="http://cxf.apache.org/jaxrs"
       xsi:schemaLocation="http://www.springframework.org/schema/beans http://www.springframework.org/schema/beans/spring-beans-3.1.xsd
          http://www.springframework.org/schema/context http://www.springframework.org/schema/context/spring-context-2.5.xsd/spring-spring-context-3.1.xsd-3.1.2.RELEASE.xsd
          http://www.springframework.org/schema/util http://www.springframework.org/schema/util/spring-util-3.1.xsd
          http://cxf.apache.org/jaxws http://cxf.apache.org/schemas/jaxws.xsd
          http://cxf.apache.org/jaxrs http://cxf.apache.org/schemas/jaxrs.xsd
">


CXF also has its own configuration files included inside the JAR files, even though these files look empty, the documentation suggests to include them so here are the lines for it:


    <!-- import cxf webservices -->
    <import resource="classpath:META-INF/cxf/cxf.xml" />
    <import resource="classpath:META-INF/cxf/cxf-servlet.xml" />

Finally, we need to declare the bean we just created as a Spring Bean and reference it in a SOAP and a REST endpoint:


    <jaxws:endpoint 
        id="mywebservice" 
        implementor="#webserviceImpl" 
        address="/myws" />
    
    
    <jaxrs:server id="myrestservice" address="/rest">
        <jaxrs:serviceBeans>
            <ref bean="webserviceImpl" />
        </jaxrs:serviceBeans>
    </jaxrs:server>
    
    <bean id="webserviceImpl" class="com.juancavallotti.cxfdemo.MyWebServiceImpl" /> 

The last ingredient is configuring the CXF servlet in our web.xml file.

Configuration of web.xml

The configuration of this file is pretty standard, first I have declared the CXF servlet and map it to the /ws/* URL pattern, and then I just declared the standard listeners for the Spring Framework to work on a web environment.


    <!-- the cxf servlet -->
    <servlet>
        <servlet-name>cxfservlet</servlet-name>
        <servlet-class>org.apache.cxf.transport.servlet.CXFServlet</servlet-class>
    </servlet>
    <servlet-mapping>
        <servlet-name>cxfservlet</servlet-name>
        <url-pattern>/ws/*</url-pattern>
    </servlet-mapping>
    
    <!-- spring context and request listeners -->
    <listener>
        <listener-class>org.springframework.web.context.ContextLoaderListener</listener-class>
    </listener>
    <listener>
        <listener-class>org.springframework.web.context.request.RequestContextListener</listener-class>
    </listener>

Running the example


After following these steps we are ready to run the example application, if you have forked or cloned the sample application just run: $ mvn tomcat:run command line and after the startup, point the browser to: http://localhost:8080/CxfDemo/ws, you should see a very simple webpage that informs the webservices running on the CXF servlet and links to the WSDL and the WADL:


Conclusions

CXF is a very powerful and complete framework for exposing services as web services, I think it is the natural choice if you want to enable web services in your spring application. Be aware that you will find outdated documentation and be sure to read the documents about the architecture before planning to reverse-engineer the framework or else you'll find the task rather frustrating.


Sunday, July 15, 2012

Concurrency Tests with JUnit

Sometimes in the life of a programmer, a concurrency test is needed to check if a given framework function doesn't break the data when used simultaneously by different threads.

JUnit provides some sense of AOP by using the @Rule annotation which allows us to modify how a given test runs. I was trying to create these kind of tests for my DTO framework (jDTO Binder) and inspired by this blog post, I created a test rule that allows the programmer to specify the number of threads to run a given test case and collect some little statistics about the running time of the test.

First of all I created an implementation of TestRule.


The previous gist may be used by anyone who would like to create concurrency tests and dont care that much about the execution exceptions but rather the overall results of the tests.

The code does the following:

  1. Create a ThreadPoolExecutor with the size of the tests, you may use other executor implementation if you wish so.
  2. Create a CountdownLatch to make sure all the tests start almost at the same time.
  3. Create a CountdownLatch to block the test thread until all tests finish.
  4. Add all the required tasks to the executor, which will wait until all all have been scheduled.
  5. If some test fails, then a flag will be set to true.
  6. Log the execution time.
  7. Fail the test if some of the threads had an exception.
So at this point we're ready to use the rule on a simple concurrency test:


And as simple as that we have a concurrency test with some statistics on the running time.

Sunday, May 20, 2012

Wicket 1.5 + Spring Framework + Hibernate + jDTO Binder Sample Application

In this post I'll go through a sample project I've created to demonstrate jDTO Binder in action with some of the most popular frameworks on the Java world. The sample project is publicly available on GitHub.

To get the project running without too much fuss, then just checkout the project, open it on netbeans 7.1.2 and hit run :)

If you're on linux or mac os X then you can do something like this:

$ git clone git://github.com/jDTOBinder/jdto-sample-projects.git
$ cd jdto-sample-projects/jdto-wicket-demo/
$ mvn clean tomcat:run

After that you may point your browser to http://localhost:8080/jdto-wicket-demo/ and that's it, you should see something like this:


The CSS3 Highlights:

The styling is pretty standard styling what can be kind of uncommon is the menu box which is rotated and it has a little shadow, also some google web fonts are being used, let's go with the easiest first, the shadow:

box-shadow: 6px 6px 5px #888;

The parameters mean in order, the horizontal distance, the vertical distance the blur distance and the shadow color.

Also you can see that the box is kind of rotated let's say 8 degrees to the left? Normally that would have been defined by using the transform property, but it seems that is still not that supported in all browsers, so I have added three rules to support webkit, mozilla and internet explorer 9:

-webkit-transform:rotate(-8deg);
-moz-transform:rotate(-8deg);
-ms-transform: rotate(-8deg);

Finally, to include some web fonts, some import statements must be added:

/* import the google web font  */
@import url(http://fonts.googleapis.com/css?family=Averia+Libre:700);
@import url(http://fonts.googleapis.com/css?family=Oxygen);

That enabled me to use the "Averia Libre" and "Oxygen" fonts on my styles.

The Wicket Highlights

Apache Wicket is a really nice web framework that you can use to build everything in Java, from websites to web applications, there are some things that may be uncommon for some developers, I've used the wicket:link tag to include css resources packaged on the classpath:

<head>
    <title>jDTO Binder Pizza Orders!</title>
    <wicket:link>
        <link rel="stylesheet" type="text/css" href="jdtopizzas.css" />
    </wicket:link>
</head>

Normally one would have had that css resource included on the java code but this wicket magic makes it more intuitive and consistent.

Another use of the tag is to link between pages, as I show in the following example:

<p>Take a look at the <wicket:link><a href="ViewOrdersPage.html">orders you have already created</a></wicket:link>.</p>

In this case, I have a ViewOrdersPage.java file and by creating the link this way, wicket takes care of pointing the href to the right place without adding extra Java code.

DTOs as the Wicket Models

Wicket extensively uses "intermediate" objects to act as the model of it components this is where DTOs come in handy, since you can modify the data they carry without affecting the data on the database, they are perfect for using them as the components model. The following code shows how you bind a wicket form with the "form" that takes the service to create a new pizza order:

PizzaOrderForm form = new PizzaOrderForm();
form.setPizzas(new ArrayList<PizzaDTO>());

//create the order form.
orderForm = new Form<PizzaOrderForm>(
        "orderForm",
        new CompoundPropertyModel<PizzaOrderForm>(form));

//for the case you want to add pizzas and you have already filled the form elements.
//this is only necessary because I left out the menu list from the form.
orderForm.add(new TextField("customerName").add(new BlurAjaxFormSubmitBehavior()));
orderForm.add(new TextField("customerPhone").add(new BlurAjaxFormSubmitBehavior()));
orderForm.add(new TextField("customerAddress").add(new BlurAjaxFormSubmitBehavior()));

With the use of CompoundPropertyModel things are really easy. I've added a behavior that submits the form data every time the field losses focus, this prevents unwanted data erasing on the client side. (Also I could have designed my page a little better hehe).

Spring and Hibernate Highlights

As this is a sample application but is intended to show real-life stuff, it uses spring framework and hibernate, but if you had to install and configure a database server to test the application, you probably wouldn't test it, so here is how I've used the H2 embedded database engine to use just your computers memory a little bit more:

<bean id="dataSource" class="org.apache.commons.dbcp.BasicDataSource" destroy-method="close">
    <property name="driverClassName" value="org.h2.Driver"/>
    <property name="url" value="jdbc:h2:mem:pizza"/>
</bean>

As you can see, the database connection pool has the url "jdbc:h2:mem:pizza" and that is all what it takes to tell H2 that you don't want to persist anything.

Finally, I've used a singleton bean to load the sample data when the application starts, this bean loads the list of available products.

<!-- initial data loader bean -->
<bean id="initialDataLoader" class="org.jdto.demo.InitialDataLoader" />

class InitialDataLoader {
    
    private static final Logger logger = LoggerFactory.getLogger(InitialDataLoader.class);
    
    @Autowired
    private HibernateTemplate template;
    
    @PostConstruct
    @Transactional(propagation= Propagation.REQUIRES_NEW)
    private void init() {
        createPizzas();
    }

    private void createPizzas() {
        logger.info("Creating initial set of pizzas!");
        
        Pizza pepperoni = new Pizza("Pepperoni Pizza", 4, 8.50);
        Pizza mozzarella = new Pizza("Mozzarella Pizza", 3, 7.50);
        Pizza special = new Pizza("Special Ham Pizza", 5, 10.0);
        Pizza onion = new Pizza("Onion Pizza", 4, 9.0);
        Pizza anchovy = new Pizza("Anchovy Pizza", 2, 7.95);
        
        template.save(pepperoni);
        template.save(mozzarella);
        template.save(special);
        template.save(onion);
        template.save(anchovy);
    }
}

One of the beauties of Spring is that you can use package-scoped classes as beans so you don't expose them to the team developers (and they don't feel tempted to use them).

Since this bean will be executed on startup time we will need a brand new transaction, so I've set the propagation attribute to "requires new".

jDTO Binder Highlights

In this application, jDTO Binder takes care of copying data between domain objects and DTO objects, how it's being used is described on the project's README file.


That would be all for now, please feel free to make comments on the post and I hope you find it useful for starting a new project with this great technologies.

Sunday, March 25, 2012

Java architecture with DTOs

The DTO Discussion

The DTO (Data transfer objects) pattern is really useful if you intend to achieve a clean separation between the service layer and the presentation layer of the application. DTOs are part of the service layer API and therefore something that is best to have than not to.

DTOs also serve another purpose: Adapt model values, which in most cases are normalized, to view-friendly values, which most of the time presents particular values from an object graph and also calculated values.

Very often, applying the DTO pattern in a given architecture is not an easy task, you earn an application easy to maintain  by spending a lot of time (shallow) copying data from one object to another.

One solution for the data copy problem can be found by using a framework, in this case jDTO Binder. jDTO Binder makes easy for the programmer to achieve some tasks:


  • Receive form values and copy them to target business objects.
  • Create lists with data from particular properties of an object graph.
  • Add to those lists calculated values.
  • Change the format of the data to be more appropriate for display or network transmission.
I've taken the time to create a sample maven project with a very popular setup: Spring Web MVC, Spring Framework and Hibernate. Although you can use this project as a starting point to build a web application with this technologies, this project incorporates jDTO Binder into its ecosystem and demonstrates how it makes your life a lot easier.

To run the project, just unzip the file, open the terminal and type the following commands:

$ cd <path to the unzipped folder>
$ mvn clean install tomcat:run

Project Description and Walkthrough.


Required Skills: To go through this project, basic Spring Web MVC knowledge is required. Even though the important part is written on the service layer, Spring MVC and Spring Context knowledge helps a lot to put all the pieces together.

The DTOs

The following snippets shows the DTOs this project uses and its purpose:

public class PizzaDTO implements Serializable {
    
    @Source("id")
    private Long pizzaId;
    
    
    @Sources(value={@Source("pizzaName"), 
        @Source("price")}, merger=StringFormatMerger.class, mergerParam="%s ($ %.2f)")
    private String description;
    
    private double price;
    private int rating;
    ...
}


The first DTO to analyze is the PizzaDTO, this one is intended to serve in a listing of available pizzas. It has a description attribute which is intended for display and is created from the pizza name and the pizza price in a formatted string.

public class PizzaOrderForm implements Serializable {
    
    @NotEmpty //validation annotation
    @Source("whoOrderedName")
    private String customerName;
    
    @NotEmpty //validation
    @Source("contactNumber")
    private String customerPhone;
    
    @NotEmpty //validation
    private String customerAddress;
    
    @Size(min=1) //validation
    @DTOTransient
    private List<PizzaDTO> pizzas;
    ...
}

The second DTO is really the model of a form to take a pizza order, it does not only have DTO binding annotations but also standard JSR 303 bean validation annotations so the data can be validated automatically.

public class OrderDTO implements Serializable {
    private static final long serialVersionUID = 1L;
    
    private Long id;
    
    @Source("whoOrderedName")
    private String customerName;
    
    private String customerAddress;
    
    @Source("contactNumber")
    private String customerPhone;
    
    @Source(value="orderDate", merger=DateFormatMerger.class, mergerParam="MM/dd/yyyy hh:mm")
    private String orderDate;
    
    @Source(value="pizzas", merger=SumMerger.class, mergerParam="price")
    private Double orderPrice;
    ...
}

Next on the line is a DTO intended for a list of pizza orders, it contains most of the data the pizza order has but also it calculates the price of each order so you don't have to do it manually or save the amount in an extra field on your database table.

The Service Class

Now we've got to the interesting part, how the service layer takes advantage of these DTOs to make your life easier. The following is the declaration of the PizzaOrderService, I'll show separately the implementation methods so I can give a little more explanation of each without having you to scroll up and down repeatedly :).

@Service
@Transactional
class PizzaOrderServiceImpl implements PizzaOrderService, Serializable {

    private static final long serialVersionUID = 1L;
    @Autowired
    private HibernateTemplate hibernate;
    @Autowired
    private DTOBinder binder;
    @Autowired
    private Validator validator;
    
    ... //implementation goes here
}


This is a normal service class, it is transactional because it interacts with hibernate, it has injected an instance of the very helpful class HibernateTemplate, also has injected an instance of the DTOBinder (which is configured as a spring bean in applicationContext.xml), finally the JSR 303 standard bean validator to perform validations on objects (also declared as a spring bean).

This class is serializable because it may be serialized for example in a web session.

    @Override
    public List<PizzaDTO> listAvailablePizzas() {

        DetachedCriteria criteria = DetachedCriteria.forClass(Pizza.class);
        criteria.addOrder(Order.asc("pizzaName"));

        return binder.bindFromBusinessObjectList(PizzaDTO.class, hibernate.findByCriteria(criteria));
    }

This method queries the database for pizzas, and returns the list as a list of PizzaDTO by taking advantage of the DTO Binder. Please note that if we hadn't used the DTO framework, we would have had to iterate over the list returned by hibernate template and build the DTO instances ourselves by setting and formatting the values; all is taken care by the framework.

    @Override
    public boolean placeOrder(PizzaOrderForm form) {

        //may validate with hibernate validator
        if (!validator.validate(form).isEmpty()) {
            return false;
        }

        PizzaOrder order = binder.extractFromDto(PizzaOrder.class, form);


        order.setOrderDate(new Date());
        order.setPizzas(new ArrayList<Pizza>());

        for (PizzaDTO pizzaDTO : form.getPizzas()) {
            Pizza pizza = hibernate.get(Pizza.class, pizzaDTO.getPizzaId());
            order.getPizzas().add(pizza);
        }

        hibernate.save(order);

        return true;
    }

This method may look familiar to you if you had to build functionality for adding data to a database in the past :). In this case we get a PizzaOrderForm as a parameter, use the validation framework to check the data, extract the form values into a proper business object using de DTO framework, set data that was not inputted, relate the order with the actual pizzas and finally persist the order!

That's a lot for the few lines of code we've written! If we hadn't had use the DTO framework, then we would have had to manually copy each property of the form into the appropriate property of the business object, which can take several more lines.

    @Override
    public List<OrderDTO> listOrders() {
        DetachedCriteria criteria = DetachedCriteria.forClass(PizzaOrder.class);
        criteria.addOrder(Order.desc("orderDate"));

        return binder.bindFromBusinessObjectList(OrderDTO.class, hibernate.findByCriteria(criteria));
    }

The last method is much the same as the first one so no further discussion is needed.

A couple of final words.

As we may have noticed, this architecture is rather simple but full featured. It uses data validation, transactional behavior and the code is kept really small and clean thanks to the DTO Binding framework.

When used the right way, DTOs are a very powerful tool and makes our application even more bullet-proof by isolating completely the database code (persistent objects included) from the presentation tier.

Another thing to note is that, if you need to change from where data is acquired, add or remove fields is just a matter of configuring the DTO object and nothing else! Compare this to the traditional approach in which you would have added the extra field and then going through each loop when you populated the DTO and add the extra data copy operation.